Mudflaps cut road spray, protect paint and lamps, and keep wiring cleaner on long routes. Many fleets want those gains without punching new holes in the frame or bumper. This upgraded guide shows practical no-drill paths that use factory points, clamp systems, and purpose-built mud flap mounting brackets. You will see step sequences, fitment checks, and small details that reduce rework in PDI bays.
Parts and tools checklist
Parts
- Pair of mudflaps sized to tire width and ride height
- No-drill truck mud flap mounting brackets or hangers that match the frame tail or bumper beam
- Stainless or zinc-plated bolts and washers that reuse OE holes
- Optional: quick-release pins, large backing plates, reflective plates
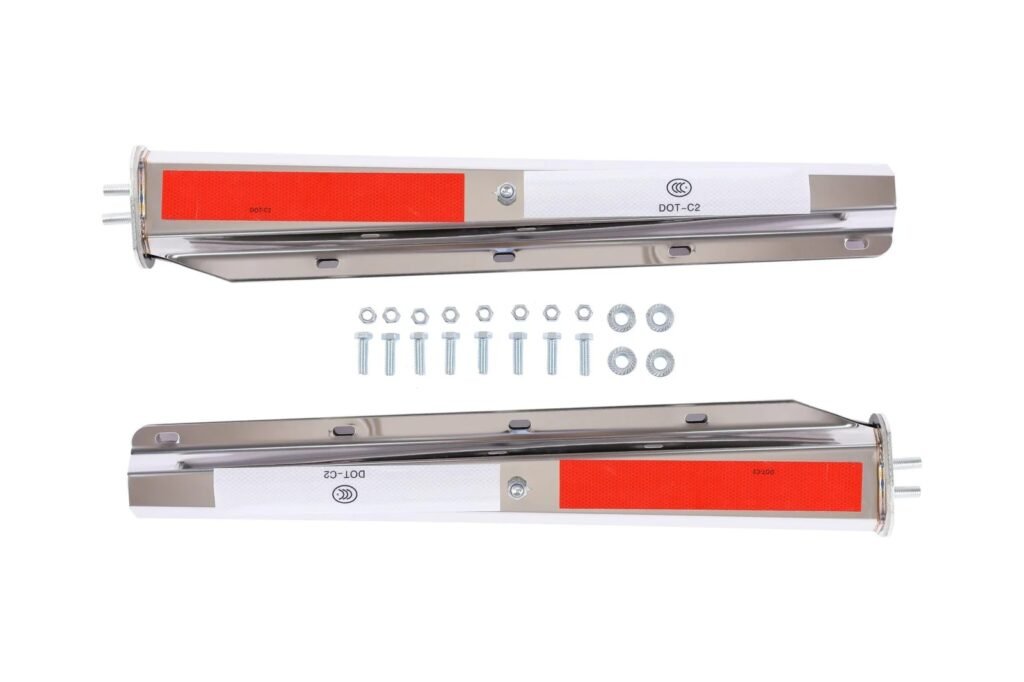
- Product examples you can choose: Angled Heavy Duty Mud Flap Hanger Set (XKJ-MFH-01-SS-1/8) for trucks that need extra stiffness; Black Mud Flap Hangers (Pair) (XKJ-MFH-02-1/8) when a low-glare coated finish is preferred; and Aluminum Alloy Reflector Plates for Trailer (XKJ-MFS-Q24AL) when routes require added rear conspicuity.
Tools
- Socket set and torque wrench
- Measuring tape, square, marker
- Trim tools for plastic liners
- Thread locker, anti-seize, light rubber shims for painted surfaces
- Shop rags and spray cleaner
Fitment notes
Identify any unused threaded holes at the rear crossmember or tow assembly. Confirm wiring, ABS lines, air lines, or sensors that run near the mounting zone. Dry fit the bracket before you pick fasteners.
Choose your no-drill path.
With factory mounting holes
Select brackets with slotted feet or adapters that line up to OE holes. Hand start all bolts. Square the bar to the tire face, then torque in stages so the hanger sits true. Use large washers on both sides of the rubber to spread the load.
Typical specs
- Flap width: at least tire width
- Bottom edge target: around wheel centerline at nominal load
- Clearance: minimum 12 to 25 mm to ground in normal stance
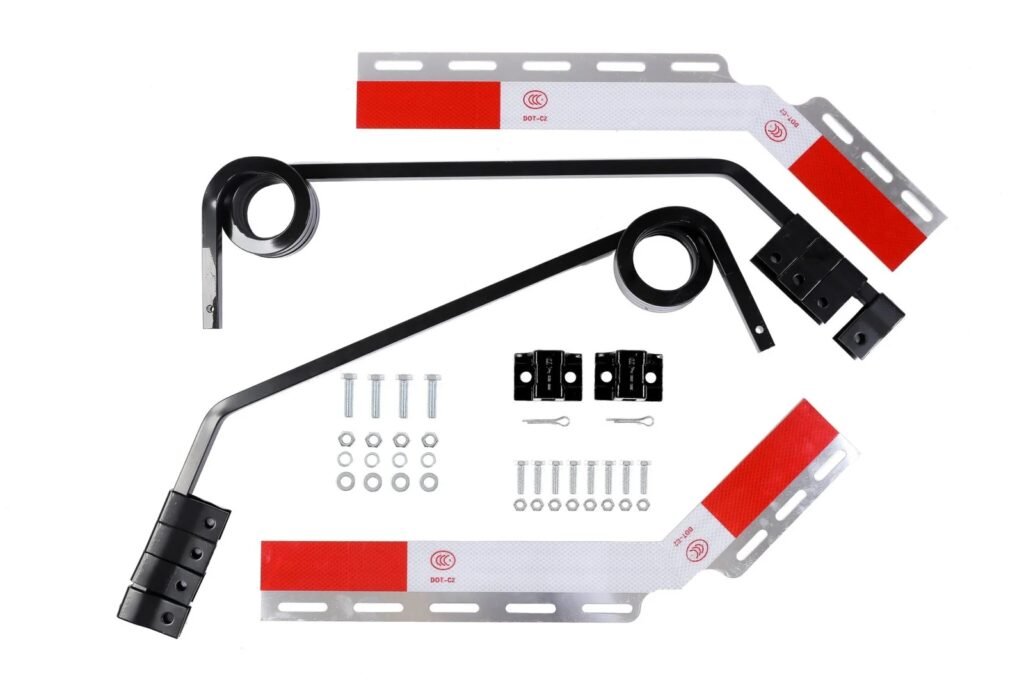
For tractors and day cabs that reuse OE holes, the Angled Mud Flap Hangers for Heavy Duty Semi Trucks (XKJ-MFH-Q1C) provide a compact package with solid bar stiffness, reducing flap flutter at highway speeds.
Without factory holes on the frame
Use clamp-on systems that bite the frame flange. Surfaces must be flat, clean steel. Add a thin rubber shim where powder coat reduces friction. After installation, retorque at 100 miles and again after the first week.
If you must clamp to a frame flange, a straight bar kit such as Black Straight Bar Mud Flap Hanger Bracket Kit (XKJ-MFH-SBK) keeps the assembly light while offering adequate slot range for alignment.
With fender flares or side steps
Interference happens near the lower flare or step bracket. Add spacers to push the bar clear. Keep the flap vertical so the spray is directed down, not back toward the tanks. Cycle the suspension to full compression and check clearance.
With plastic wheel liners
Do not pierce new holes. Re-use OE push-pin points and install small backing plates that spread load across the liner standoffs. Replace plastic pins with machine screws and wide washers only where OE allows.
Hitch receiver or bumper reuse
Receiver-mounted crossbars pin into a 2-inch hitch, keeping the frame untouched. Confirm pin length and clip orientation so it cannot walk out. On multi-hole bumpers, share tow hook bolts with an adapter plate if clearance allows.
Step by step: a clean, no-drill install
Step 1. Measure and plan
Check flap size, target height, and bracket style. On air-ride axles, set ride height first. Mark a vertical reference line from the tire center to the ground to help with squaring.
Step 2. Test fit the bracket
Hold the bracket to the frame or bumper. Align slots to OE holes. Verify that harnesses and air lines have room. Use 3 to 6 mm spacers to clear rivet heads when needed.
Step 3. Bolt the bracket
Apply a small dab of thread locker to reused hardware. Start all bolts by hand. Square the bar with a carpenter’s square. Torque to the kit spec. If not specified, follow the grade-and-size chart used in your shop.
Step 4. Mount the flap
Set the rubber against the bar. Place washers on both sides. Tighten from the center outward so the flap stays flat and the logo sits level. Sight from the rear to confirm both sides match height.
Step 5. Functional check
Bounce the rear suspension or roll over a small speed bump at walking pace. Look for contact, twist, or rattle. Adjust as needed. Schedule a retorque after the first 100 miles.
Buyer’s guide to bracket styles
- Angled bar hangers add stiffness and direct spray downward. See this reference angled heavy-duty mud flap hanger to compare geometry and packaging space on tractors and day cabs.
- Straight bar hangers are lighter and easier to align on flat bumper beams. Browse the broader mud flap hanger category to compare clamp types, slot length, and bar thickness.
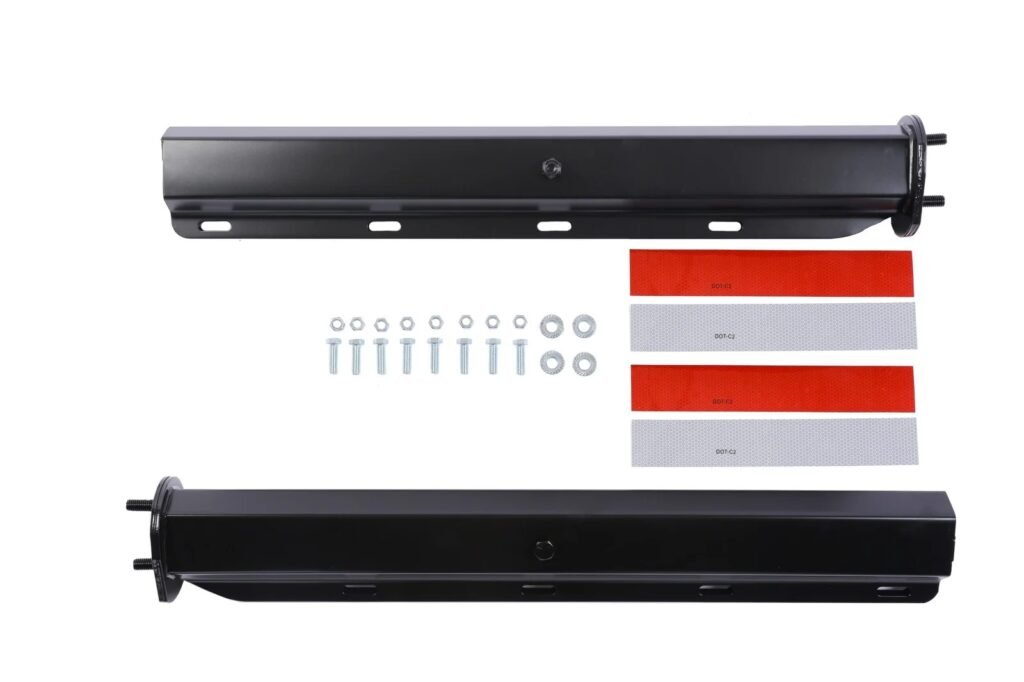
- Coated black pairs suit fleets that want low glare and added corrosion resistance. This set of black mud flap hangers shows typical finish options and fastener kits.
The Mud Flap Hanger Bracket Set for Semi Truck (XKJ-MFH-01-1/8) and Black Mud Flap Hanger Set with Reflector Tape (XKJ-MFH-03-1/8) are two common choices when you need either a stainless look or integrated conspicuity, respectively.
When you source mud flap mounting brackets, confirm material certs, bar thickness, slot range, finish, reflective plate options, and spare pin availability. Ask for batch traceability and carton labels if you ship to multiple depots.
Compliance and warranty cues
- Check local rules for flap width, height above ground, and coverage angle. Some corridors also call for reflective plates near tanks.
- Using OE points usually keeps vehicle warranty exposure low. When in doubt, document torque values and photos of reused holes.
- Keep at least 12 mm tire clearance under full compression. On gravel routes, increase the gap slightly to reduce scalloping.
For routes with stricter conspicuity needs, the Aluminum Mud Flap Hanger Reflector Plate for Semi Truck (XKJ-MFS-S24AL) can be added to the bar without drilling new frame holes.
Maintenance after install
- Retorque clamp bolts at 100 miles, one week, and quarterly.
- Rinse winter salt from the bar and hardware.
- Inspect the lower edge for scraping that signals the flap is too low.
- Replace distorted backing plates to stop tear-out.
Troubleshooting quick list
- The bracket rotates on the frame
Add a serrated washer or a thin shim. Land the clamp on a flat, paint-free area and retorque. - Flap sits crooked
Loosen the bar, square to the tire line, tighten from the center outward. - Rattle on washboard roads
Add anti-rattle shims between the bar and the backing plate. Check the quick-release pin fit. - The spray still hits tanks or wiring
Increase flap width or use an angled bar so spray is thrown down instead of back.
Notes for installers and distributors
For repeated installs, standardize a small kit per bay: torque chart by bolt size, spacer pack, rubber shims, reflective plate screws, and two spare quick-release pins. On procurement, align SKUs by bar length, angle, finish, and fastener type. For export orders, confirm packaging drop tests, barcode labels, and photo guides in each carton. Buyers respond well to a short fitment survey that captures frame flange thickness, presence of OE holes, need for quick release, and winter route exposure. This data prevents mismatch and cuts returns.
FAQs
Q1. Can clamp-on brackets hold up on gravel routes?
Yes, provided the contact faces are flat, hardware is torqued correctly, and you retorque after early miles. Choose thicker bars for 30 or 36 inch flaps.
Q2. How high should the flap sit above the ground?
A common road target is around the wheel centerline at normal load. On rough sites, raise slightly to avoid scraping.
Q3. Can I mount mudflaps on plastic liners without drilling?
Yes. Re-use OE push-pin points and add backing plates that spread load across liner standoffs. Avoid new holes in thin plastics.
Q4. Do hitch-mounted crossbars affect towing?
They use the receiver pin, so check pin length, clip security, and trailer chain access. Remove the bar when using weight distribution gear.
Q5. What slows rust in salt states?
Use stainless hardware where possible, rinse often, add a thin rubber shim under clamps, and keep a retorque schedule.

